

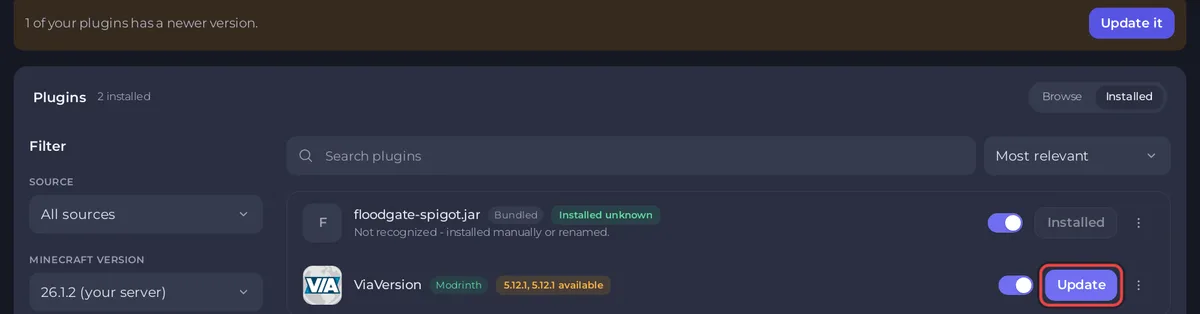
Open Modding, then Plugins or Mods, and click Installed. A plugin or mod with a newer build shows both versions, such as 2.9.1, 2.12.1 available, and an Update button. When several are out of date, a bar above the list offers Update all for every one of them at once.
Take a backup first if you might want to go back. An update replaces the file, and a new build may change what is saved in your world. See How to create, download and restore backups.
Update one plugin or mod
- Open your server in the panel, click the Modding tab, then Plugins or Mods, then Installed.
- Click Update on the row.
- The window Update with the name shows
Fromthe installed versiontothe new one, and says your configuration is left alone: only the file is replaced, and the old file is removed once the new one is in place. - Click Update and restart.
- Restart the server yourself. Despite the button's name, the panel only replaces the file and does not restart the server. See How to start, stop, restart and force-stop your server.
A plugin or mod you switched off stays switched off after an update.
Update all at once
- On the Installed list, the bar says how many have a newer version, for example
3 of your plugins have a newer version.Click Update all 3 (or Update it when there is only one). - The window lists them and explains that each is replaced by the newer build the catalog lists, and the old file goes only once the new one is in place.
- Leave Restart the server when this finishes ticked to have the panel restart the server at the end, or untick it to restart later.
- Click the button at the bottom, which names the count, for example Update 3 plugins. Each row shows its progress.
- At the end the window says
All 3 updated. The server is restarting., orRestart to load them.if you unticked the box. If some failed, it says how many and why on their rows, and the rest are in place.
Install a specific version
Use this to go back to a build you know works, or to pick a build for another Minecraft version.
- On the Installed list, open the menu at the end of the row (the three dots, Options for the name) and choose Choose a version.
- The window Install with the name lists the builds under
Minecraftand a version, with a badge: Release, Beta, Alpha or Dev. The newest release is selected. - Pick a build. If another build of the same project is installed, the window warns
Keeping both will stop the server starting.Tick Remove the older version. - Click Install with the version number.
- Restart the server.
Builds from SpigotMC have only the latest version, so there is nothing older to choose.
Which builds the panel offers
- Update and Update all take the newest stable build for your server's Minecraft version. A beta or development build is offered only when no stable build fits, and its badge says so, for example
(beta) available. - Only plugins and mods the panel recognises get update badges: those it finds on Modrinth, CurseForge or Hangar. A file that shows
Not recognized - installed manually or renamed.has to be updated by hand. See How to upload your own plugins or mods to your Minecraft server.
Good to know
- Mods: every player needs the same update on their own computer. See How to get your players ready for a modded Minecraft server.
- Moving your server to a newer Minecraft version usually means updating plugins and mods too. See How to update your Minecraft server.
- A modpack is updated as a whole: How to update your modpack on your Minecraft server.
- If the server does not start after an update, use Choose a version to go back, or restore your backup. See How to see why your Minecraft server stopped.


