Every server has its own page in the panel. Everything you need sits on that page, in three places: the header at the top, the tabs under it, and the menu on the left.
The header: name, status and Start
At the top you see the server name, a status badge, the game, the number of player slots and the server type. The status badge says Offline, Starting, Online or Stopping, and shows other states such as installing or suspended when they apply. The button on the right is Start when the server is offline. While it is running, the power controls are Stop, Restart and Kill.

The tabs

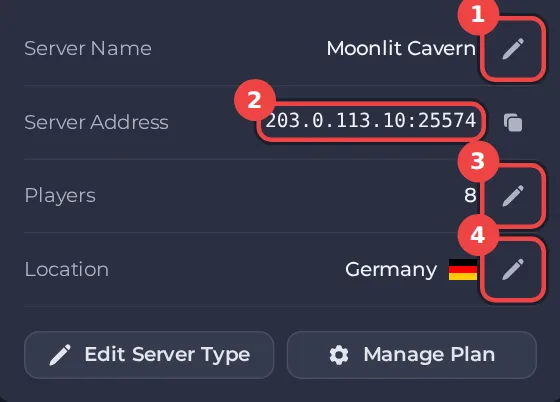
- Overview is the page you land on. It shows the server name, address, player slots and location, a Console preview and live usage graphs.
- Console shows what the game prints and lets you type commands. See How to use the console and run commands.
- Files is the server's own folder, where worlds, configuration files and mods live. See How to upload, edit and manage files.
- Settings holds the game's own options (Game Settings), the way the server is launched (Startup Parameters) and the exact start command (Launch Details). See How to change your server settings.
- Modding installs plugins, mods or modpacks for the games that support them, and a Workshop tab appears for Steam Workshop games. Servers of games without add-ons may not show these tabs. See How to add mods, plugins and modpacks.
Invite people, at the end of the tab row, lets you share the server. See How to invite friends and give them access.
The side menu
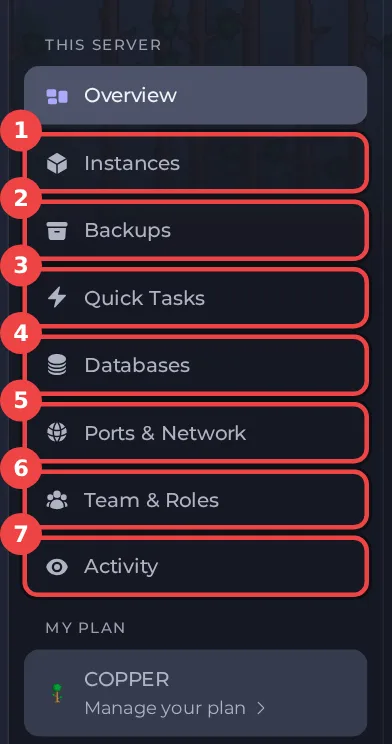
- Instances lets one server hold more than one world or setup and switch between them.
- Backups saves copies of your server and restores them.
- Quick Tasks runs actions in one click and on a schedule, such as an automatic daily backup.
- Databases shows databases for plugins that need one, when your plan includes them.
- Ports & Network shows your address and ports, and the dedicated IP option.
- Team & Roles controls who else can open this server and what they can do.
- Activity lists what happened on the server and who did it.
Under the menu, My plan opens your plan, where you change plan, billing cycle and extras.
The Overview page
The Overview shows the server name, Server Address, Players and Location, with a pencil to edit the name, player slots and location. Below are your pinned quick tasks, recent activity, a console preview and Usage graphs for CPU, memory and storage over the last 30 minutes.
What to do first
- Press Start and watch the console until the server is online.
- Copy your address and join. See How to join your server.
- Check Quick Tasks. A daily automatic backup is normally already scheduled for you. See How to schedule tasks and automatic backups.