

The first time you open a new Minecraft server in the panel, a short setup fills the screen. It asks what the server is for, which version to run, a few world choices and a name, then installs everything and starts the server. The server does not start until you click Finish Setup, so answer it before you invite anyone.
Start the setup
- Open your server in the panel. The setup opens by itself with Welcome:
A few steps to get your server running. It won't start until this setup is finished. - Click Start.
The steps are listed on the left on a computer, and as Step 2 of 5 (for example) on a phone. You can go back at any time with Back. From the second step on, Skip and start finishes with the defaults for every step you have not answered.
To leave without finishing, click the X at the top right. Its tooltip says Finish later: the server starts once setup is done. The setup opens again the next time you open the server.
Step 1: What is this server for?
Pick the closest card. The panel chooses the software and a version that fit.
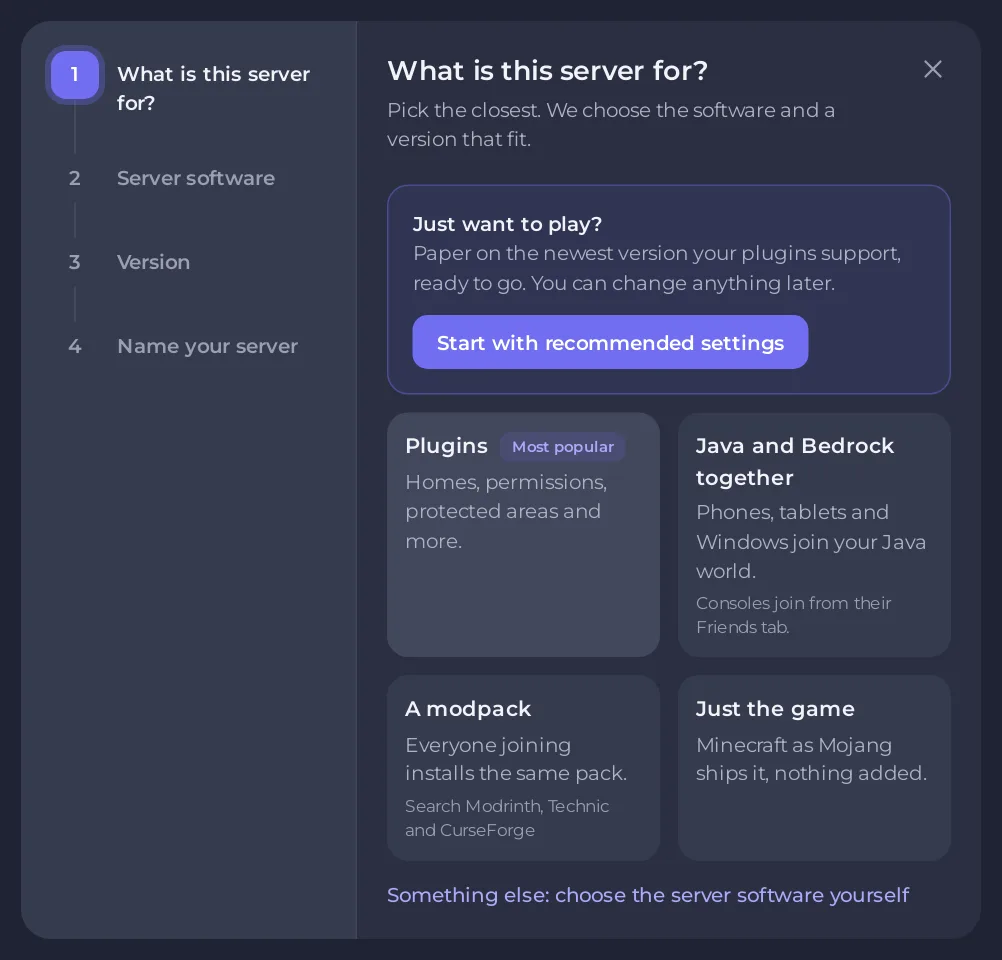
- Plugins (marked Most popular): Paper, with plugins for homes, permissions, protected areas and more. Players join with the normal game.
- Java and Bedrock together: Paper with crossplay, so players on phones, tablets and Windows PCs join your Java world. The version list only offers versions crossplay supports.
- A modpack: search the modpack sources the panel lists and install a pack. Everyone joining needs the same pack.
- Just the game: Vanilla, Minecraft exactly as Mojang ships it, nothing added.
- Something else: choose the server software yourself: the full list of server types, with a search box. Paper is the usual choice; Spigot builds itself while it installs and needs much more memory, so pick Paper on a small plan. See Minecraft server types explained.
In a hurry? The box Just want to play? at the top has Start with recommended settings. It picks Paper on the newest version your plugins support and jumps to the last step. You can change anything later.
Step 2: Version
Choose the Minecraft version from Version. The newest is marked (latest) and is already selected. Pick an older one only if your friends or your plugins need it.
- Release channel appears for server types that also publish test versions. Keep Stable (recommended). Snapshots (test versions, can break worlds) are for testing.
- Let Bedrock players join (crossplay) appears where crossplay can run on that type and version. On the Java and Bedrock path it is switched on for you, and on the other paths it can already be on too. It gives Bedrock players a port of their own, which uses one port of your plan. Switch it off if only Java players will join. If the panel cannot set crossplay up during the setup, for example because every port of your plan is in use, the Bedrock crossplay card on Ports & Network later says
Crossplay was not set up during setupwith the reason, and you can turn it on there. See How to let Bedrock players join your Java server with Geyser. - Advanced options, on types that publish separate builds, holds Build and Java runtime. Leave them as they are: the panel already picks the newest build and the right Java for the version.
On the Plugins and crossplay paths the panel may pick an older version than the newest, the newest one every starter plugin (or crossplay) supports. The note under the list says so, and ViaVersion is added so players on the newest version still get in.
Step 3: Plugins (Plugins and crossplay paths)
Tick the plugins you want now. They are all optional, and you can add more later on the Modding tab.
- LuckPerms: decide who can use which commands.
- EssentialsX: homes, warps, kits and the everyday commands players expect.
- WorldEdit: build and change large areas in seconds.
- WorldGuard: protect spawn and other areas from griefing.
- CoreProtect: see who broke or placed what, and roll it back.
- Chunky: generate the world ahead of time, so exploring does not lag.
A plugin that has no build for your version yet says so and cannot be ticked.
Step 4: Your world
These choices are used once, when the world is made. The defaults are fine.
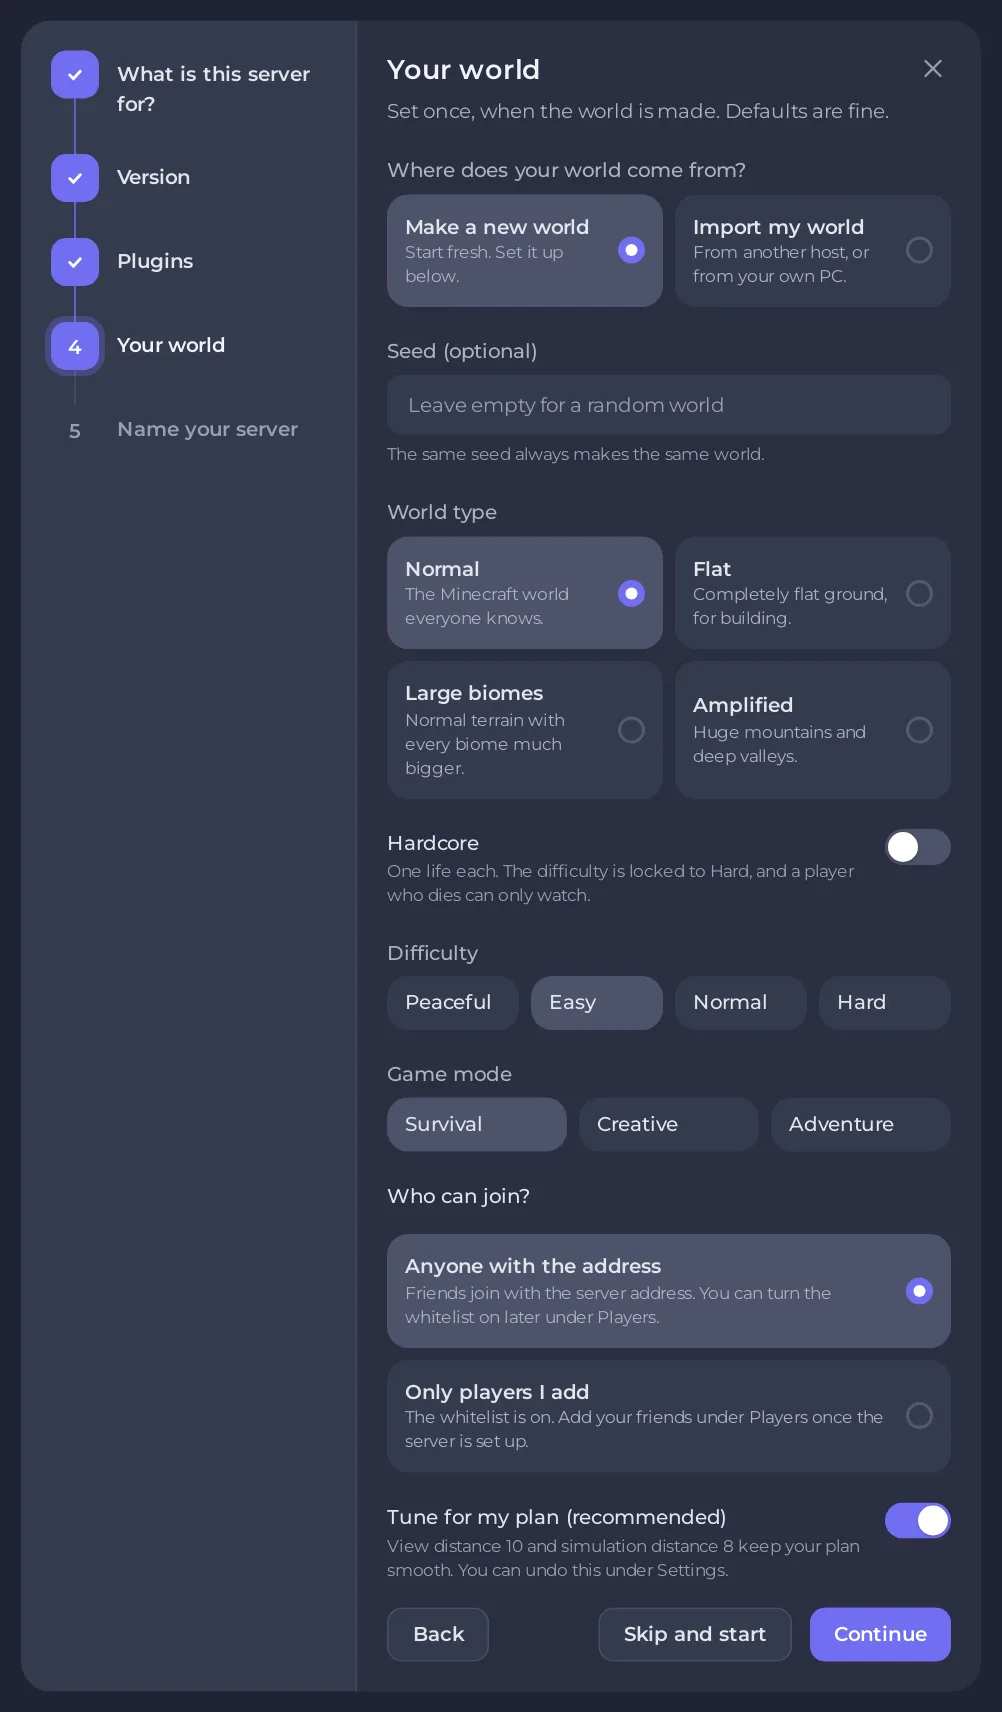
- Seed (optional): the same seed always makes the same world. Leave it empty for a random world.
- World type: Normal, Flat (for building), Large biomes or Amplified (huge mountains). Amplified worlds take much longer to generate and need more memory, and on a plan under 4 GB the step warns you.
- Hardcore: one life each. The difficulty locks to Hard, and a player who dies can only watch.
- Difficulty: Peaceful, Easy, Normal or Hard. Easy is the default.
- Game mode: Survival, Creative or Adventure. Survival is the default.
- Who can join?: Anyone with the address (the default), or Only players I add, which turns the whitelist on.
- Tune for my plan (recommended): shown when the panel has view and simulation distances sized for your plan. It sets both before the first start, is on by default, and you can undo it later under Settings. See How to change view distance and simulation distance on your Minecraft server.
If the step asks Where does your world come from?, you can choose Import my world to bring a world from your PC or another host. See How to upload your own Minecraft world.
Step 5: Name your server
- Type a Server name of 1 to 50 characters. It is the name you see in the panel. You can change it later.
- Add a Description if you like.
- Type Your Minecraft name (optional). You will be an operator and on the whitelist from the first start, so you can always join your own server. A Java name is 1 to 16 letters, numbers or underscores.
- Click Finish Setup.
If you chose Only players I add and left your name empty, the step warns you: you will not be able to join until you add yourself on the Players page.
There is no EULA box to tick. Accepting Mojang's EULA is part of the terms you agreed to when you ordered.
When you finish
The panel installs the server and starts it. The last screen says <your server name> is starting (or is online once it is up) and shows your address with the join steps for Java Edition and What we set up. If something could not be added, such as a plugin with no build for your version yet, a Good to know box says so. While the server is still starting, the screen says it is ready in about a minute.
- Click Copy next to the address and send it to your friends.
- Click Go to my server.
Next: How to start your Minecraft server for the first time shows what the Console prints while it starts, and How to join your Minecraft server has the join steps.
Change it later
Nothing here is final:
- Another type or version: How to change your Minecraft version or server type.
- Difficulty, game mode and other settings: Minecraft server properties explained.
- Whitelist on or off: How to set up a whitelist and ban players on your Minecraft server.
- A modpack: How to install a modpack on your Minecraft server.
The seed, world type and hardcore only apply to a new world. To use new ones on a world you already have, see How to use a seed and world type on your Minecraft server.


